captPike Project
CaptPike Project

This project allows you to tell what your IP address at boot/startup even without a monitor, keyboard or mouse! (Headless). This is done using a simple and unique method (LED) to alert you of your IP address. I looked on the internet for a way to do this and the popular solutions were to use a static IP, go into the router and look for the IP or use software like 'arp-scan' to find the IP. There is also a way for the Raspberry pi audio to speak the IP at boot but I never got it to work so well. I would be using a large wireless network where I would get served a DHCP IP address, I did not have access to their routers and there were so many IP addresses that I did not want to take the time for arp-scan. So I made captPike. I will tell you all the steps and mistakes it took me to get this to work. Keep in mind that before this project was complete, I still had the Raspberry Pi connected to a monitor, keyboard and mouse as usual.

OK Ready? Let's cut this Pi...

I got my Raspberry Pi up to date..

I first started out with a 4GB SD card and downloaded the Debian "Wheezy" OS for the Rapberry Pi and put it on the 4GB SD card using the win32diskimager tool. After this, I followed the suggestion of many others and opened a terminal window on the Raspberry Pi and typed in these commands:

sudo apt-get update
sudo apt-get upgrade

You should too. This updates your Raspberry Pi with the lastest and greatest. It takes a long time so start it and go to lunch or something. When it finished I found that it had filled the 4GB SD card 99%. I wouldn't have any room for my stuff! So I bought a 16GB SD card and used the win32diskimager  tool to transfer the image. My suggestion would be to
Use at least an 8GB SD card from the beginning.

I installed a WiFi USB Module

You do not have to have Wifi for captPike to work but it was the reason I made captPike. You can use captPike with regular ethernet with DHCP just as well. I use a D-Link 7-Port Powered Hub to power my Raspberry Pi. It gives me the extra USB ports I need for stuff like the USB Wifi Module I got from Adafruit Industries. My USB WiFi Module is based on the Realtek RTL8188CUS chipset which has good support on the internet. Some sites have great setup information, others not so much.
Here are the ones that helped me the most:

Those got me up and running. The 2 important files to remember are:

/etc/network/interfaces
/etc/wpa_supplicant/wpa_supplicant.conf

I learned how the /etc/network/interfaces file is configured because it is there that the DHCP/Static IP address scheme is detemined. After I got my network connection going, I could move on to the next step.

I installed TightVNC on my Raspberry Pi

The reason for having a 'headless' Raspberry Pi is that one can control it remotely with software like   Putty,   an SSH client or   TightVNC,   (Virtual Network Computing). Putty only has to loaded on the remote computer but TightVNC has to be loaded on both remote computer and Raspberry Pi. Click on the link for a great tutorial of how to setup   TightVNC. I followed the instructions so that the VNC server on the Raspberry Pi would start during the bootup sequence.

I installed wiringPi on my Raspberry Pi

WiringPi is a GPIO Interface library for the Raspberry Pi. It was written in C by Gorgon Henderson and can be obtained from   wiringPi.com   The GPIO (General Purpose Input Output) allows the Raspberry Pi to communicate with the ouside world via a DIP header located on the Raspberry Pi circuit board. I went to the   Download and Install   section of Gordon's website to put wiringPi on my Raspberry Pi.   I had bought the   Raspberry Pi Starter Pack   from   Adafruit Industries   so I already had the GPIO cable, Pi Cobbler breakout, breadboard and LED I would need for Gordon's   Blink Example.   I compiled the example C program , executed it and voila! I had a blinking LED.

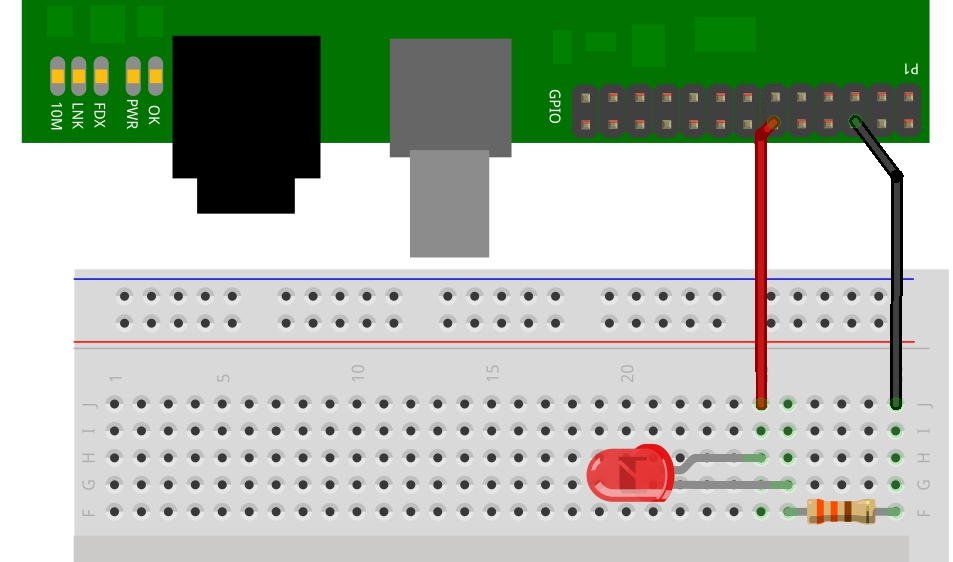
I made one change to my setup. Gordon's example uses wiringPi pin0 (GPIO0) as is shown below.

blink1

I was going to be using a 4 pin connector as described in next section below so in order to line the pins up I switched to wiringPi pin1 (GPIO1) as shown below. I did have to modify the C program to accomodate this by changing any reference of pin0 to pin1.

blink1
captPike Hardware

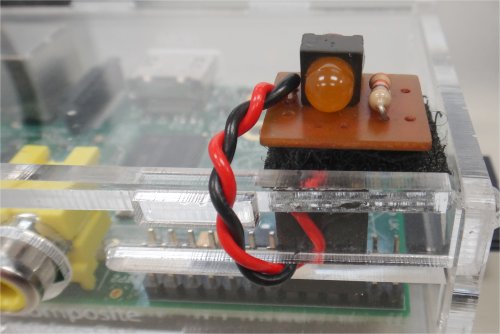
I went out to my shed to look through the old parts junk. I found an old connector that was used to hook up a speaker once and a small circuit board which used to have a photo interrupter on it. I de-soldered the parts off the circuit board and soldered on a mounted LED and resistor and the wires from the speaker connector:

connector hardware

And with some velcro I attached it to the Raspberry Pi. Since I was now using wiringPi pin1 (GPIO1), it was a perfect fit with the speaker connector:

connector hardware
captPike Software

A compiled C program that reads a text file and flashes an IP address via LED. The text file that is read is "ifconfig.txt" and is made in directory /home/pi by a script that will be mentioned later. For testing purposes, this text file can be created by starting a terminal session at location /home/pi and entering the following at the prompt:

ifconfig > ifconfig.txt

which will simply redirect the ifconfig information to the text file.
You can either grab the program text for captPike.c below or download it here.

Place it in the /home/pi directory. Use the following command to compile it as to include the location of the needed wiringPi library:

gcc -Wall -I/usr/local/include -L/usr/local/lib -lwiringPi captPike.c -o captPike

Make sure the file has correct privileges by

sudo chmod 755 captPike

If you have a good ifconfig.txt file then test captPike by entering:

sudo ./captPike lo

This should blink the loopback "lo" IP address 127.0.0.1
If you have ethernet or WiFi sucessfully configured and connected then you can
replace "lo" on the command line above with "eth0" or "wlan0".

Note that the sudo is needed for the wiringPi component.

Also note that if you have not aquired an IP address for these, captPike will do nothing.

The captPIke blink protocol is as follows:

3 seconds 'on' as a start 'get ready' indicator
digits are displayed as half second 'on'/'off'
space between digits is a second and a half
'dots' are displayed as a 150 millisecond 'blip'
Note: digit 0 (zero) is displayed as 10 blinks (you can't blink zero times!)

/*=================================================================
Program: captPike.c
Purpose: To flash an LED indicating an IP address.
Usage  : sudo ./captPIke wlan0 (example: could be eth0, lo, etc...)
Author : Bob Schumann (SampleBandit)
Date   : July 2013
Notes  : Prior to calling this program, a script runs the command
       : ifconfg > ifconfig.txt. This program opens that text file
       : and searches for the ip address that matches the command
       : line argument interface (see Usage above ^ ) Using the
       : wiringPi component requires the 'sudo' preface.
       :
       : The captPIke blink protocol is as follows:
       : ------------------------------------------
       : 3 seconds 'on' as a start 'get ready' indicator
       : digits are displayed as half second 'on'/'off'
       : space between digits is a second and a half
       : 'dots' are displayed as a 150 millisecond 'blip'
       : Note: digit 0 (zero) is displayed as 10 blinks
       :       you can't blink zero times!
Thanks : Gordon Henderson for wiringPi
=================================================================*/

#include <stdio.h>
#include <string.h>
#include <wiringPi.h>

int main(int argc, char *argv[])
{
    int  i, j;
    char *infilename = "ifconfig.txt";
    FILE *infile;
    char line_buffer[BUFSIZ];
    char *search = "inet addr:";
    char *found;
    int  ip[15];
    int  ip_count;

    /* open text file */
    infile = fopen(infilename, "r");

    /* wiringPi settings */
    wiringPiSetup();
    pinMode(1,OUTPUT);

    /* get to the section where argument interface is defined */
    while (fgets(line_buffer, sizeof(line_buffer), infile)) {
        found = strstr(line_buffer, argv[1]);
        if (found != NULL) {
            /* the next line has the ip address */
            fgets(line_buffer, sizeof(line_buffer), infile);
            /* the ip address is after "inet addr:" */
            found = strstr(line_buffer, search);
            found += strlen(search);
            /* copy ip to array */
            i=0;
            while (found[i] != 32) {
                /* normalize ASCII to integer */
                ip[i]=found[i]-48;
                i++;
            }
            ip_count=i;
        }
    }

    /* close text file */
    fclose(infile);

    /* 3 second start indicator */
    digitalWrite(1, HIGH);
    delay(3000);
    digitalWrite(1, LOW);
    delay(3000);
    /* display IP to LED */
    for (i=0;i<ip_count;i++) {
        if (ip[i] >= 0) {
            /* digits */
            if (ip[i] == 0)
                /* Zero is special case blink 10 times */
                ip[i]=10;
            for (j=0;j<ip[i];j++) {
                digitalWrite(1, HIGH);
                delay(500);
                digitalWrite(1, LOW);
                delay(500);
            }
                delay(1500);
        }
        else
        {
            /* dot */
            digitalWrite(1, HIGH);
            delay(150);
            digitalWrite(1, LOW);
            delay(1500);
        }
    }
    return(0);
}


At this point captPike is ready to use but I wanted to execute it at start up and show me the IP address it had aquired. I had to make a startup script and install it. I had a little trouble at first because captPike would run before the lan drivers were going and I got nothing. The '# Required-Start: $all' line in the following script ensures everything is loaded before my script is called. Notice the start and stop sections in the case statement. These are called by the system at startup and shutdown once the system has installed the script.

You can either grab the script text for captPike.sh below or download it here.

Copy this file to location /etc/init.d (use sudo if needed)

sudo cp captPike.sh /etc/init.d

Make sure the file has correct privileges by

sudo chmod 775 etc/init.d/captPike.sh

To install the script:

sudo update-rc.d captPike.sh defaults

To uninstall the script:

sudo update-rc.d captPike.sh remove

### BEGIN INIT INFO
# Provides: captPike
# Required-Start: $all
# Required-Stop: $remote_fs $syslog
# Default-Start: 2 3 4 5
# Default-Stop: 0 1 6
# Short-Description: Display IP address via LED at boot time
# Description: Display IP address via LED at boot time
### END INIT INFO
#! /bin/sh
# /etc/init.d/captPike

case "$1" in
 start)
   echo "captPike Blinks IP Address"
   # Replace wlan0 with alternate interface if needed
   cd /home/pi
   ifconfig > ifconfig.txt
   sudo ./captPike wlan0
   ;;
 stop)
   echo "Stopping captPike"
   ;;
 *)
   echo "Usage: /etc/init.d/captPike.sh"
   exit 1
   ;;
esac

exit 0

Project Complete

Now having this project done, I can move on to other projects like using a Raspberry Pi to control robotics from a remote location. I will probably use Atmel AVR's to control the robotic circuitry like servos and sensors but use the Raspberry Pi as master. Possibly maybe even some SPI...

Take Care...
Sample Bandit